Golden-Crust Perfection and Melting Magic: The Ultimate Grandma-Inspired Grilled Cheese
There is something timeless about a grilled cheese sandwich. It’s one of those meals that seems almost too simple to get wrong—bread, cheese, heat, and a bit of fat. Yet anyone who has ever bitten into a perfectly made grilled cheese knows that simplicity can be deceptive. The difference between an average sandwich and an unforgettable one lies in the smallest details: the type of bread, the balance of fats, the choice of cheese, and most importantly, the patience in how it’s cooked.
This recipe is inspired by a classic, almost old-fashioned approach—one that values technique over shortcuts and understands that comfort food deserves just as much attention as any gourmet dish. At its core, this method transforms a basic grilled cheese into a crispy, golden, deeply flavorful experience with a perfectly melted, stretchy interior. The “secret” isn’t complicated, but it is powerful: combining butter and mayonnaise on the outside of the bread to create the ultimate crust.
The Philosophy Behind the Perfect Grilled Cheese
Before diving into the steps, it helps to understand why this method works so well.
Most people rely entirely on butter for grilling, which adds flavor but can burn quickly if the heat is too high. Others have discovered mayonnaise as a substitute, thanks to its oil-and-egg composition that browns evenly. But the real magic happens when you combine both.
Butter brings richness and that familiar nostalgic taste. Mayonnaise, on the other hand, spreads more easily and browns more consistently. Together, they create a crust that is crisp, evenly golden, and slightly tangy—without becoming greasy or burnt.
This dual-layer approach is what elevates the sandwich from ordinary to exceptional.
Ingredients (Simple but Intentional)
- 2 slices of thick-cut bread (white or sourdough preferred)
- 2–3 slices of cheese (cheddar + mozzarella is ideal)
- 1 tablespoon softened butter
- 1 tablespoon mayonnaise
- A pinch of salt
Optional additions:
- A sprinkle of garlic powder
- A thin slice of tomato
- Caramelized onions or cooked bacon
Each ingredient has a role. The bread must be sturdy enough to hold the filling but soft enough to bite through easily. The cheese combination is key—cheddar provides bold flavor, while mozzarella delivers that satisfying stretch.
Step 1: Preparing the Bread
Lay your slices of bread flat on a clean surface.
On one side of each slice, spread a thin, even layer of mayonnaise. Be sure to reach the edges—this ensures even browning.
On the opposite side, spread a light layer of softened butter.
This might seem excessive at first, but the balance is important. You’re not soaking the bread—you’re coating it just enough to create a uniform crust.
Step 2: Building the Sandwich
Place your cheese between the slices, with the buttered sides facing outward (these will touch the pan).
Press the sandwich gently together. Don’t squash it—just enough to hold everything in place.
If you’re adding extras like tomato or onions, keep them thin. Too much filling can prevent the cheese from melting evenly.
Step 3: The Most Important Step—Cooking Slowly
Heat a non-stick pan or skillet over low to medium heat.
This is where most people go wrong. High heat will toast the bread too quickly, leaving the cheese unmelted inside. The goal is slow, even cooking.
Place the sandwich in the pan and let it cook undisturbed for several minutes.
You should hear a gentle sizzle—not an aggressive crackle.
After a few minutes, check the underside. You’re looking for a deep golden-brown color. If it’s browning too fast, lower the heat.
Step 4: Flip and Finish
Carefully flip the sandwich and repeat the process.
You can press lightly with a spatula to ensure even contact with the pan, but avoid flattening it too much—this can push out the melted cheese.
For extra meltiness, cover the pan with a lid for a minute or two. This traps heat and helps the cheese fully soften and stretch.
Step 5: Rest and Slice
Once both sides are golden and crisp, remove the sandwich from the pan.
Let it rest for about a minute.
This step is often overlooked, but it makes a difference. It allows the cheese to settle slightly, so it doesn’t spill out immediately when cut.
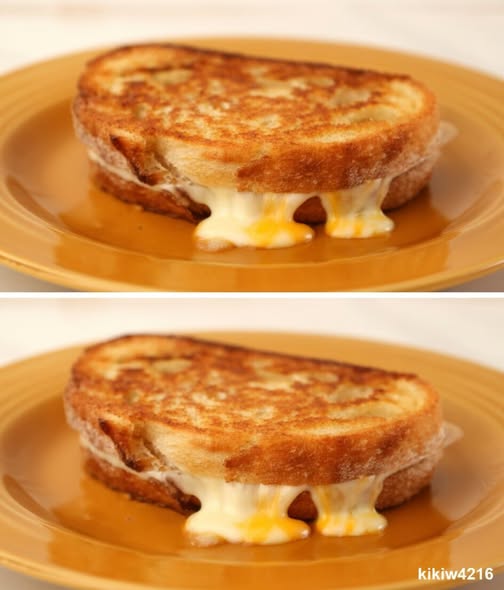
Slice diagonally and watch as the melted center gently pulls apart.
The Result: A Perfect Balance
What you end up with is more than just a sandwich.
- A crisp, golden crust with a slight tang
- A rich, buttery flavor that isn’t overwhelming
- A gooey, stretchy interior that feels indulgent
- A perfect contrast between crunch and creaminess
It’s familiar, yet somehow elevated.
Ways to Elevate It Even Further
Once you’ve mastered the base technique, you can experiment:
- Caramelized onions add sweetness and depth
- Bacon introduces a smoky, savory note
- Gruyère or fontina create a more refined flavor
- Herbs or spices can be sprinkled onto the buttered side before cooking
Even pairing it with warm tomato soup turns it into a complete comfort meal that feels nostalgic and satisfying.
Why This Recipe Matters
What makes this grilled cheese truly special isn’t just the ingredients or even the technique—it’s what it represents.
It’s proof that great food doesn’t need to be complicated.
It’s about slowing down, paying attention, and doing simple things well.
It’s about transforming everyday ingredients into something that feels comforting, intentional, and memorable.
In a world that often prioritizes speed and convenience, this recipe is a reminder that patience and care can turn even the most basic meal into something extraordinary.
The next time you make a grilled cheese, don’t rush it.
Take your time. Trust the process.
Because sometimes, the smallest details make the biggest difference—and in this case, they create a sandwich you’ll never forget.